Cool Clay Neuron Models
- The Biology Buzz Place

- Jul 12
- 6 min read
Updated: Jul 13
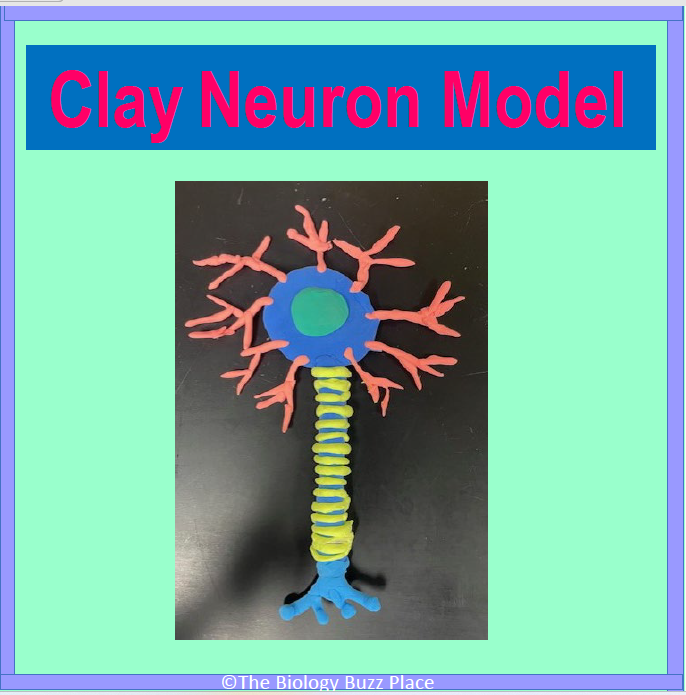
Get crafty with this clay neuron model. It's the perfect addition to your nervous system unit. The neuron is the coolest looking of all the cells. Most students enjoy making things with clay. It is kind of therapeutic and relaxing for students to feel the clay's soft texture and to mold it into different things. Students who are kinesthetic and visual learners will be especially drawn to this method of learning.
Most students like when art is incorporated into their core content classes, and making these models does fall into the art category, as students will get to choose their own colors and shape theirs slightly differently than their classmates. In the end, it is fun for students (and you, the teacher!) to see how different the neuron models turn out.
After the lesson, if students don't want to take them home, you can get some string and attach them to the ceiling for a cool hanging display to make your classroom more cozy. Okay, so I think I have done my best to persuade you to try this out with your students :). Now let’s get to how to build it.
What you will need to do first:
You will need to have clay on hand for the five parts to this neuron model:
1. Cell body (Also called the soma)
2. Nucleus
3. Dendrites
4. Axon and axon terminal
5. Myelin sheath
* You will need at least four different clay colors for this (five, if you want the axon and cell body to be a different color) but if you want, you can use the same color clay for both the axon and the cell body.
Where to buy the clay? You can buy air-drying soft clay online or at a craft store of some sort. I have bought some at Hobby Lobby I really liked, and some on Amazon. Both I worked just fine. One I like to use is Sago Brothers Air Dry Clay. This is the one I purchased from Amazon. It comes in a variety of colors, are easy to work with, and dry relatively quickly. There are a lot of excellent comparable air-drying clay you can purchase whether online or in stores, these are just the ones I have used. Whichever clay you buy though, try it out first for yourself and see if you like it. This way you will be happy with the results when your students go to make it.
If you are like me, you are on a budget, and this clay can get kind of pricey if buying for all of your classes. Ask parents/guardians early in the year to donate to your class using a class wish list on Amazon. You will be surprised to see that many parents will donate supplies if you ask. Okay, now let's get to the fun part-making the model!
How to Build Your Neuron Model:
1. Start with the cell body by getting a ball of clay, then roll it in your hands until it is a smooth
ball, then flatten it with your hands. Don’t forget to add a nucleus. Students don’t have to add
other organelles, but they should know that the cell body is the part of the neuron that
contains all the organelles that the other cell types in the body have too. See the three pictures
below.


2. Next, you can make the axon using a different color, or the same one as the cell body. To do
this, take some clay and roll it into a long, closed tube shape. Smooth it out by rolling it on a
desk or table surface. You can leave it straight, or bend it slightly to give it a curve.
3. Begin to add the myelin sheath, the fatty substance that wraps around and covers the axon.
It is the yellow clay in the picture below. Then you will attach this to the cell body.


The myelin sheath keeps the electrical impulse contained in the axon so it can pass quickly from one neuron to another neuron. For this part, you will need a different color clay than you used for the axon. Take a small piece of clay and roll in your hands to make it thin, then wrap carefully around the axon. Keep doing this until you get close to the end of the axon. You can leave a little space between each section of the myelin sheath, so you can see parts of the axon or you can wrap it up nicely as shown in the picture above.
4. Now you will add the dendrites around the cell body. Be careful not to make them to thin, as
they will be more likely to break easily when the model dries. Make them a little thick, but not
too thick. Either way they will be delicate when they dry, so tell your students to handle them
with care after their model dries.

Now you can add an axon terminal. This is where the electrical impulse is converted into a chemical signal (a neurotransmitter). The neurotransmitters are then released into the synaptic cleft that lies between two neurons. This is how neurons communicate with other neurons and with other cells.

*Let the models dry over night for the best results. It will be easier to handle.
Extension:
Future doctors in your classes? Curious students? Teach kids about multiple sclerosis while doing this neuron-building activity. Let students know that some people have a genetic disease called multiple sclerosis, where the person’s own immune system attacks the myelin sheath in neurons in the central nervous system. This leaves the axon damaged and scars the nerves, making it difficult for neurons to conduct electrical impulses. This then either slows or brings to a stop nerve conduction. Patients begin to have trouble moving their muscles.
Have on hand two neuron clay models for demonstration purposes, one with an axon that is wrapped in an intact myelin sheath and one that has myelin sheath that is damaged (see the pictures below). This way you can show students what the neuron looks like in people with multiple sclerosis. Of course, you can also have students create this model, too, if you have enough clay for them to make two models. In the picture below, the neuron model on the right is a healthy neuron and the one on the left is a diseased one-it is showing a neuron with multiple sclerosis.

Research is ongoing to find ways to repair the damaged myelin sheath in multiple sclerosis patients. Maybe one of your students will contribute to this area of treatment one day and help people with this neurological disease. You never know, so teach with passion and throw in extra facts like this one for each unit when you can.
I had a very sweet student once write me an anonymous letter for a high school assignment. She, or he, as I do not know who the student was, had an assignment to write a letter to a teacher from their middle school years who inspired them and to tell them why. This person wrote that I had inspired them to want to pursue a career in medicine to become a doctor. It was a nice feeling. I wish I knew who that student was. I am sure many more were inspired to get into health careers from my lessons, just as many of yours will too. The possibilities are endless for them. Whatever they decide to do one day, keep them engaged and inspired in your classes :). I hoped you like this post.
A FREE digital downloadable neuron worksheet is available in my store that comes with an answer key. Check it out.
More Fun to your Nervous Lesson Classes
If interested in adding games to your classes, check out my Nervous System Thinking Bingo. Students will learn or review nervous system facts and vocabulary words, as well as drugs and alcohol facts in this game. It is a fun game to play at the end of the year if you have a free day or two, or at the end of your nervous system unit.


